

Mexican bread conchas are beloved sweet rolls known for their soft, fluffy texture and signature shell-like topping. This guide shares easy, authentic recipes and expert tips to help you bake perfect conchas at home.
If you’ve ever wandered past a Mexican bakery in the morning, you’ve likely been greeted by the warm, sweet aroma of freshly baked conchas. These soft, slightly sweet bread rolls are more than just a treat—they’re a cultural staple. With their golden tops and delicate, shell-like patterns, conchas are as beautiful as they are delicious. Whether enjoyed with a steaming cup of café de olla or shared among family during breakfast, they bring comfort and tradition to the table.
What makes conchas special isn’t just their taste, but their story. Originating in Mexico, these pastries are part of the rich world of pan dulce—sweet breads that are a daily ritual in many households. The name “concha” means “shell” in Spanish, a nod to the distinctive design on top that resembles a seashell. While they may look fancy, conchas are surprisingly approachable to make at home with the right recipe and a little patience.
Key Takeaways
- Conchas are a staple of Mexican pan dulce: These sweet bread rolls are iconic in Mexican bakeries and homes, often enjoyed with coffee or hot chocolate.
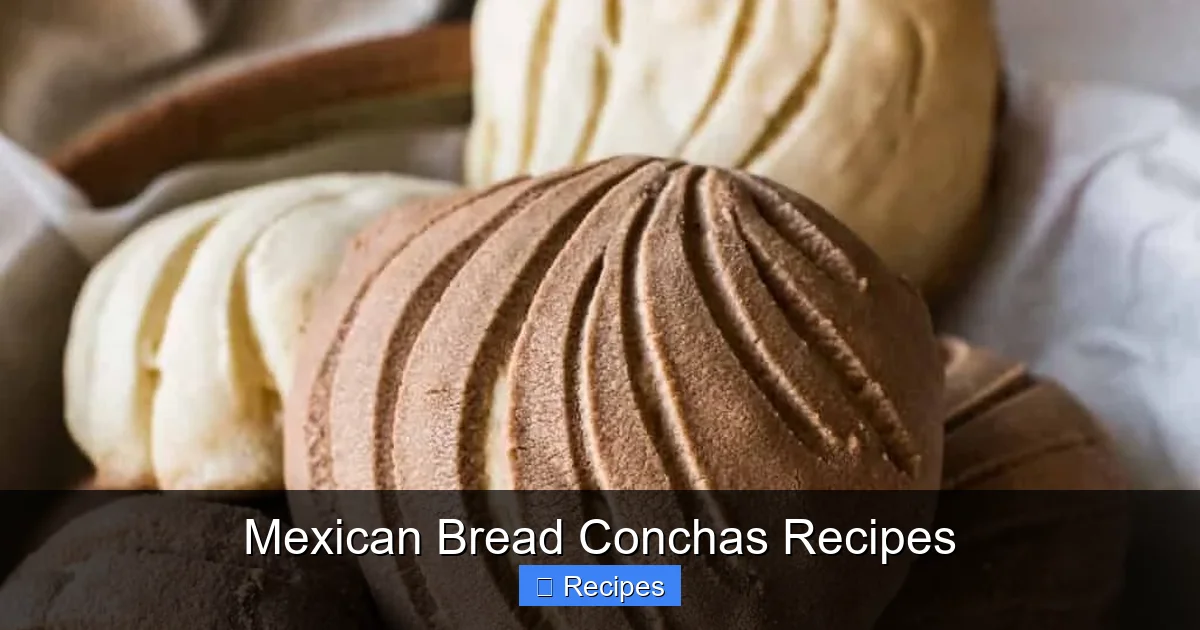
- The topping creates the classic “shell” pattern: A sugary, cookie-like dough is piped on top in a distinctive spiral design that cracks slightly during baking.
- Yeast dough requires patience and proper proofing: Allowing the dough to rise correctly ensures a light, airy texture—don’t rush this step.
- Flavor variations are easy to customize: Add vanilla, cinnamon, or citrus zest to the dough, or use chocolate or strawberry in the topping for a fun twist.
- Conchas freeze well for later enjoyment: Bake and cool completely, then freeze in airtight bags for up to 3 months—reheat in the oven for fresh taste.
- Use a stand mixer for best results: Kneading by hand is possible, but a mixer saves time and ensures even gluten development.
- Decorating takes practice—start simple: Use a piping bag with a star tip to create the classic spiral; perfection comes with repetition.
Quick Answers to Common Questions
What do conchas taste like?
Conchas have a soft, slightly sweet bread flavor with a tender crumb. The topping adds a subtle crunch and a hint of vanilla or other flavorings, making them perfect with coffee.
Can I make conchas without a stand mixer?
Yes! You can knead the dough by hand. It will take about 12–15 minutes of vigorous kneading to develop the gluten properly.
How do I know when conchas are done baking?
They’re done when the tops are lightly golden and the bottoms sound hollow when tapped. Internal temperature should be around 190°F (88°C).
Can I use instant yeast instead of active dry?
Yes, you can substitute instant yeast. Skip the activation step and mix it directly with the dry ingredients.
Why did my conchas turn out dense?
This is usually due to under-proofing, too much flour, or expired yeast. Make sure your yeast is fresh and allow enough time for both rises.
📑 Table of Contents
What Are Mexican Bread Conchas?
Mexican bread conchas are soft, sweet rolls made from a rich yeast dough, typically flavored with vanilla or citrus zest. They’re topped with a crumbly, cookie-like mixture that’s piped on in a spiral pattern before baking. As the bread rises and bakes, the topping cracks slightly, creating that iconic “shell” look.
These pastries are usually slightly sweet, not overly rich, making them perfect for breakfast or an afternoon snack. They’re often sold in bakeries (panaderías) by the dozen and come in various sizes—from small individual rolls to larger family-sized versions. While traditional conchas have a plain or vanilla-flavored topping, modern versions include chocolate, strawberry, or even matcha for a colorful twist.
A Brief History of Conchas
The exact origin of conchas is a bit of a mystery, but they’ve been a part of Mexican baking culture since at least the early 20th century. Some believe they were inspired by European pastries brought over during colonization, while others think they evolved locally as a creative way to use sweet dough and simple ingredients. Regardless of their roots, conchas have become a symbol of Mexican baking tradition, loved across generations.
Ess Ingredients for Authentic Conchas
Visual guide about Mexican Bread Conchas Recipes
Image source: i.pinimg.com
To make authentic Mexican bread conchas, you’ll need a few key ingredients that work together to create that soft, slightly chewy texture and sweet flavor.
Dough Ingredients
- All-purpose flour: The base of the dough. Use unbleached for best results.
- Active dry yeast: Helps the dough rise. Make sure it’s not expired—test it in warm water with a pinch of sugar.
- Milk: Adds richness and softness. Warm it slightly (not hot) to activate the yeast.
- Butter: Unsalted, softened. Adds tenderness and flavor.
- Sugar: Sweetens the dough and feeds the yeast.
- Eggs: Provide structure and richness.
- Salt: Balances the sweetness and enhances flavor.
- Vanilla extract: Classic flavoring—use pure vanilla for best taste.
Topping Ingredients
- Butter: Softened, for a smooth, pliable topping.
- Sugar: Granulated or powdered, depending on texture preference.
- Flour: All-purpose, to give the topping structure.
- Baking powder: A small amount helps the topping puff slightly.
- Vanilla or other flavorings: Optional, but traditional.
Step-by-Step Conchas Recipe
Now that you know the ingredients, let’s walk through a classic conchas recipe you can make at home.
Step 1: Activate the Yeast
In a small bowl, combine ¼ cup of warm milk (about 110°F or 43°C), 1 teaspoon of sugar, and 2 ¼ teaspoons (1 packet) of active dry yeast. Stir gently and let it sit for 5–10 minutes until it becomes frothy. This means the yeast is alive and ready to work.
Step 2: Make the Dough
In a stand mixer fitted with the dough hook, combine 3 cups of flour, ½ cup sugar, 1 teaspoon salt, and the activated yeast mixture. Add 2 large eggs, ¼ cup softened butter, and 1 teaspoon vanilla extract. Mix on low until combined, then increase to medium and knead for 8–10 minutes until the dough is smooth and elastic.
Step 3: First Rise
Place the dough in a lightly greased bowl, cover with a damp towel or plastic wrap, and let it rise in a warm place for 1–1.5 hours, or until doubled in size.
Step 4: Prepare the Topping
While the dough rises, make the topping. In a bowl, mix ½ cup softened butter, ¾ cup powdered sugar, 1 cup flour, ½ teaspoon baking powder, and 1 teaspoon vanilla. Mix until it forms a thick, crumbly paste. Divide into portions if making flavored versions (e.g., add cocoa powder for chocolate).
Step 5: Shape the Conchas
Punch down the risen dough and divide it into 12 equal pieces. Roll each into a smooth ball and place on a parchment-lined baking sheet, spaced about 2 inches apart.
Step 6: Add the Topping
Roll the topping mixture into small logs or flatten into discs. Use a knife or piping bag with a star tip to create the classic spiral pattern on top of each dough ball. Press gently to adhere.
Step 7: Second Rise and Bake
Cover the shaped conchas and let them rise for another 30–45 minutes. Preheat your oven to 350°F (175°C). Bake for 15–18 minutes, or until the tops are lightly golden and the bottoms sound hollow when tapped.
Step 8: Cool and Enjoy
Let the conchas cool on a wire rack for at least 15 minutes before serving. They’re best enjoyed warm, but can be stored in an airtight container for up to 3 days.
Tips for Perfect Conchas Every Time
Even with a great recipe, baking conchas can be tricky. Here are some expert tips to ensure success.
Use a Kitchen Scale
Weighing your ingredients (especially flour) ensures consistency. Too much flour can make the dough dense; too little can make it sticky.
Don’t Skip the Proofing
Rushing the rise leads to dense, tough conchas. Let the dough double in size—this is key to that soft, airy texture.
Keep the Topping Cold
If the topping gets too soft, it will spread during baking. Chill it briefly if needed before piping.
Practice the Spiral
Use a piping bag with a large star tip (like Wilton 1M) to create even spirals. Start from the center and move outward in a circular motion.
Bake on the Right Rack
Place the baking sheet in the center of the oven for even heat distribution. Avoid opening the oven door too early—this can cause the conchas to collapse.
Creative Variations and Flavors
Once you master the classic version, try these fun twists:
Chocolate Conchas
Add 2 tablespoons of cocoa powder to the topping mixture for a rich chocolate flavor. You can also add mini chocolate chips to the dough.
Strawberry Conchas
Mix 2–3 tablespoons of strawberry jam or freeze-dried strawberry powder into the topping. The pink hue adds a festive touch.
Cinnamon Swirl Conchas
Roll out the dough, sprinkle with cinnamon-sugar, then roll it up and slice into buns before adding the topping.
Lemon or Orange Zest
Add the zest of one lemon or orange to the dough for a bright, citrusy note that pairs beautifully with coffee.
Storing and Reheating Conchas
Conchas are best eaten fresh, but they store well with proper care.
Room Temperature
Store in an airtight container for up to 3 days. Keep away from moisture to prevent sogginess.
Freezing
Bake and cool completely, then wrap individually in plastic wrap and place in a freezer bag. Freeze for up to 3 months. To reheat, thaw at room temperature and warm in a 300°F (150°C) oven for 5–7 minutes.
Reviving Stale Conchas
Sprinkle with a little water and reheat in the oven or microwave for 10–15 seconds to restore softness.
Why Make Conchas at Home?
While it’s easy to buy conchas from a local panadería, making them at home offers something special. You control the ingredients, avoid preservatives, and can customize flavors to your taste. Plus, the process is deeply satisfying—there’s nothing quite like the smell of fresh bread filling your kitchen.
Baking conchas also connects you to Mexican culture in a meaningful way. It’s a tradition passed down through generations, and by making them yourself, you become part of that story.
Conclusion
Mexican bread conchas are more than just a sweet treat—they’re a celebration of flavor, texture, and tradition. With this guide, you now have everything you need to bake soft, fluffy conchas at home, complete with that beautiful shell-like topping. Whether you stick to the classic recipe or experiment with chocolate, fruit, or spice, each batch is a chance to create something delicious and meaningful.
So gather your ingredients, roll up your sleeves, and give conchas a try. Your kitchen—and your taste buds—will thank you.
Frequently Asked Questions
Are conchas vegan?
Traditional conchas are not vegan because they contain eggs and butter. However, you can make a vegan version using plant-based milk, vegan butter, and egg substitutes like flax eggs.
How long do conchas stay fresh?
When stored in an airtight container at room temperature, conchas stay fresh for up to 3 days. For longer storage, freeze them for up to 3 months.
Can I freeze unbaked conchas?
Yes, you can freeze shaped conchas after the second rise. Freeze on a baking sheet, then transfer to a bag. Bake from frozen, adding 2–3 minutes to the baking time.
What’s the best way to reheat conchas?
The best way is to warm them in a 300°F (150°C) oven for 5–7 minutes. This restores their softness without drying them out.
Why is my concha topping spreading too much?
This happens when the topping is too soft or the oven is too cool. Chill the topping before piping and make sure your oven is fully preheated.
Can I make conchas ahead of time?
Yes! You can prepare the dough and topping a day in advance. Keep the dough refrigerated and let it come to room temperature before shaping.
